![]() Synchronise the helper files to the burnt-in timecode
Synchronise the helper files to the burnt-in timecode
![]() Create helper files (Indexing process)
Create helper files (Indexing process)
This article describes how to associate a media file with the current subtitle file (Wincaps Q4 offline) or story (Q-Live).
In Wincaps Q4 Offline, a subtitle file has a single media file associated with it.
In Q-Live, each story may have a different media file.
Once a media file has been associated, it will be loaded automatically the next time you open the subtitle file (Wincaps Q4 Offline) or select the associated story (Q-Live).
If you have multiple files open, each file may have its own media associated and the active media will change automatically as you switch between documents.
![]() It is recommended that you do not exceed three w32 files open at any one time in Q4 and no more than two n32 files open in Q-Live.
It is recommended that you do not exceed three w32 files open at any one time in Q4 and no more than two n32 files open in Q-Live.
If using SubCaptioner to create a first run WebVTT or SRT file from a media file, this can then be imported into Wincaps and then the specific media file can be associated.
You associate a media file as follows:
Start with the subtitle file open (Q4 offline) or with the relevant story or stories selected (Q-Live).
Click the Toolbox->Info->File Info->Media->Wizard button, Numpad [5] or press Ctrl+Shift+W to launch the 'Choose Media Type' media wizard dialog . You can also use the right click menu in the Video Window. This launches the 'Choose Media Type' dialog.

Select either Offline Media, recommended for Mpeg-1 and WMV or MediaLooks MultiFormat, recommended for MP4, MOV and other supported formats.
If the subtitle file/story already has a media file associated with it you will be given the chance to cancel the operation
Browse to the media file and click Open
If the chosen media has helper files then the video will open.
You can configure the default location where Wincaps Q4 looks for the media files via the Configure : Default paths menu.
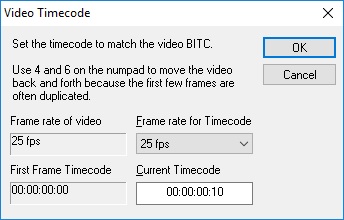
The Video Timecode dialog allows you to synchronise the media helper files to the media timecode. This dialog may be displayed in two situations:
If the media file is being indexed by Wincaps Q4 and has no embedded timecode, it will be displayed automatically as part of the indexing process
If the helper files supplied with the media do not match the media timecode, you can synchronise them manually via the Toolbox->File Info->Media->Video sync button

To synchronise the media with the helper files, select the correct frame rate for the media from the drop-down list. Then advance the video a few frames, as the first few frames of a video are often duplicate. Once the media timecode looks reliable, enter its current value into the Current Timecode box and click OK.
The Frame Rate of Video is the value that Wincaps has calculated the video media framerate to be. This is done by analysing the first few frames of an encoding and therefore is not always accurate, so always check the actual framerate of the video before selecting the framerate. The Frame rate for Timecode is the framerate you have indexed the video at and is the rate that Wincaps will play the timecode at. If a different frame rate is selected then Wincaps will re-index at the newly selected frame rate. This will overwrite the previous index files.
The First Frame Timecode shows the value of the first frame timecode and the Current Timecode will represent the timecode where the video is currently at.
![]() Note: It is important to make sure that the frame rate you set matches that of the Video itself. If indexing takes place with a frame rate that doesn't match the video, you will need to change the frame rate in Video Sync and Wincaps will re-index. Alternatively you can delete the TCC file (which will be located in the same place as your video) and re-index with the correct frame rate.
Note: It is important to make sure that the frame rate you set matches that of the Video itself. If indexing takes place with a frame rate that doesn't match the video, you will need to change the frame rate in Video Sync and Wincaps will re-index. Alternatively you can delete the TCC file (which will be located in the same place as your video) and re-index with the correct frame rate.
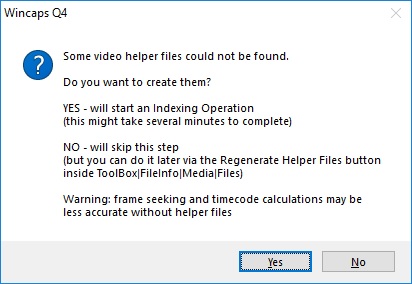
When a video media file is associated to a file for the first time and Wincaps cannot locate one or more of the helper files in the same folder as the media, you will be asked if you want to create them.

If a video is associated a second time, for example a video is being downloaded and you are re-associating a longer version, Wincaps will NOT prompt to index the video media, even if no index files exist.
Note that if you choose not to create the helper files or cancel the indexing process at any stage, the media timeline information will not be available.
If the media file being indexed has no embedded timecode, Wincaps Q4 will prompt you to synchronise the helper files to the media timecode.
For MOV media using 'Offline Media' there will be an initial delay whilst Q4 exports the WAV file information. It will then index the file, displaying the following progress screen:

Using MediaLooks MultiFormat the dialog is slightly different:

Any errors encountered during the indexing process will be displayed in this window. If no errors occur, you will see a "success" message and the media timeline information will be displayed. Progress bar may not fully complete.

![]() Note: It is important to make sure that the frame rate you set matches that of the Video itself. If indexing takes place with a frame rate that doesn't match the video, you will need to change the frame rate in Video Sync and Wincaps will re-index. Alternatively you can delete the TCC file (which will be located in the same place as your video) and re-index with the correct frame rate.
Note: It is important to make sure that the frame rate you set matches that of the Video itself. If indexing takes place with a frame rate that doesn't match the video, you will need to change the frame rate in Video Sync and Wincaps will re-index. Alternatively you can delete the TCC file (which will be located in the same place as your video) and re-index with the correct frame rate.
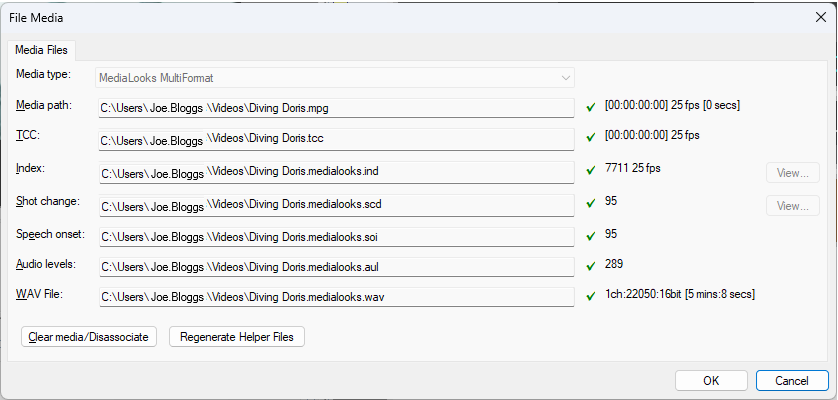
You can view the details of the currently assigned media and helper files by clicking the Toolbox->Info->File Info->Media->Files button.

The values on the right represent;
For Index, it is the number of 'records' which is typically the number of frames in the video.
For Shot Changes, it is the number of shot changes located on the video.
For Speech Onset, it is the number of 'speech blobs' located by audio software, in the video.
Click on Clear media/Disassociate to disassociate the current media from the subtitle file and also from the current story in Q-Live.

![]() Note: The framerate of the Wincaps file should match that of the video to ensure smooth playback.
Note: The framerate of the Wincaps file should match that of the video to ensure smooth playback.
See Also: